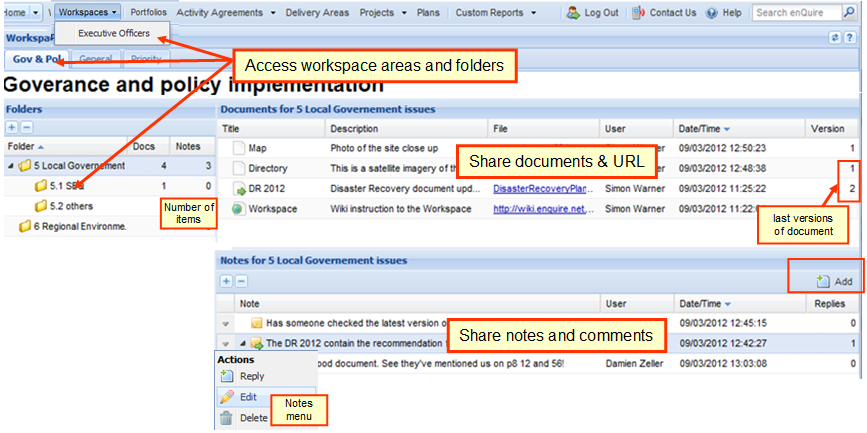
The right pane will get refreshed upon a folder selection on the left hand navigation. Both the "right upper section - files" and the "right lower section - comments" will display the contents of a folder.
| Workspace Permissions |
| Organising Shared Documents |
| Workspace User Management |
| Add Areas |
| Add Folders |
| Add Documents |
| Update Document Version |
| Add Notes |
A workspace is a convenient area created to share documents and comments amongst users in Enquire.
Each workspace is managed by a coordinator who can set-up and maintain the number of areas and projects as needed. Unlimited "tabs", "folders" and "files" can be stored in such workspace.
From the (primary) top navigation, select the "Workspace" item. Then browse normally under tab and folder like you would do a file browser.
The right pane will get refreshed upon a folder selection on the left hand navigation. Both the "right upper section - files" and the "right lower section - comments" will display the contents of a folder.
Here is a summary of the permission for the coordinator in charge of moderating a workspace and a guest who would be invited to participate,
| Role/Functionality | Coordinator |
Guest |
|---|---|---|
| Create/edit/delete Theme/Folder/sub Folders |
|
|
| Can edit/delete/upload document/URL link of their own |
|
|
| Can edit/delete/upload/update a document/URL link from someone else |
|
|
| Can download a document (/link to an URL) |
|
|
| Can add or reply to a note |
|
|
| Can edit or delete their own note |
|
|
| Can edit or delete someone else's note |
|
|
Note:
Coordinators have the responsibility to keep up to date the relevant folder structure and document versioning. 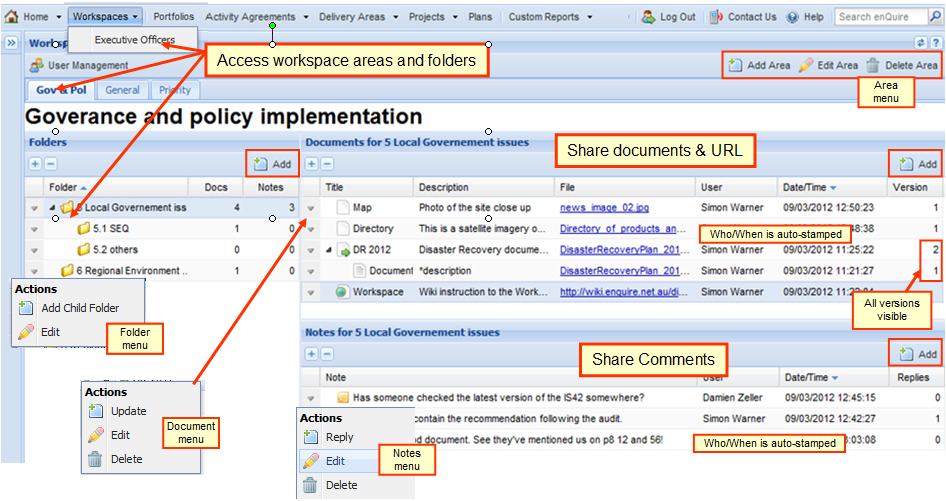
A possible option for multi-contributors consist in:
| WC |
|
|
This section is only relevant to users assigned the role Workspace Coordinator
As Workspace Coordinator you have access rights to invite and control the users in your Workspace. Once a user has been invited into the Workspace they have access to upload and comment on documents.
1) Log into your Enquire account and select the drop-down arrow next to Workspaces in the primary navigation menu. Select the Workspace you wish to enter from the drop-down menu.
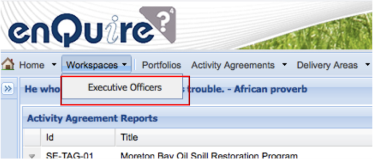
2) Select User Management

3) The User Management pop-up box will now appear on screen. This is the interface where you can:
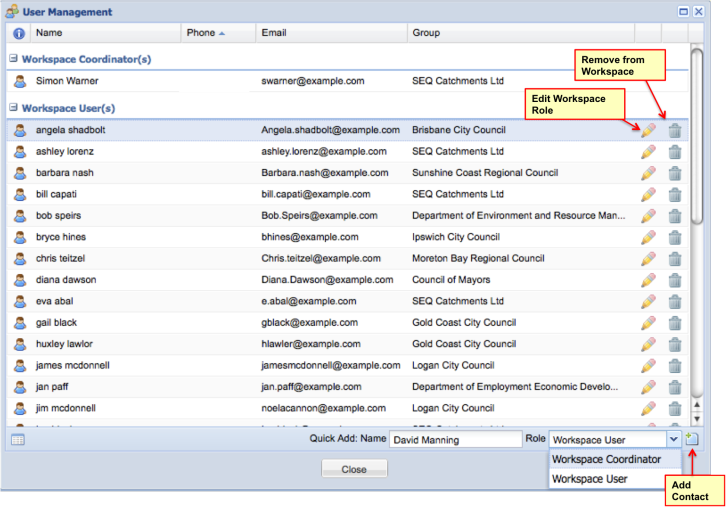
4) Once you have finished updating the Users/Coordinators within the Workspace press Close. The changes you made take place immediately.
| WC |
|
|
This section is only relevant to users assigned the role Workspace Coordinator. An Area in Enquire can also be referred to as a Theme and represents the category or theme the documents and discussions in it relates to.
1) Log into your Enquire account and select the drop-down arrow next to Workspaces in the primary navigation menu. Select the Workspace you wish to enter from the drop-down menu.

2) Select Add Area located at the top right-hand side. You will now be prompted to enter in the Area details. The Code will appear on the Area tab within the Workspace and the Title will display within the Area Folder when opened.
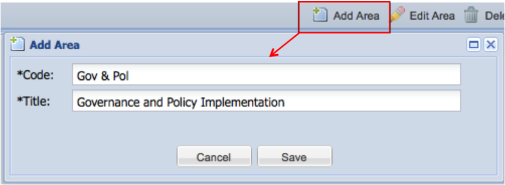
3) Select Save. Your created Area will now appear as a tab across the top of the Workspace.

1) Once you are in the relevant Workspace, select the tab of the Area you wish to edit.
2) Select Edit Area at the top right-hand side of the screen.
3) You will now be able to edit the Code and Title. Select Save. Changes will take place immediately.
1) Once you are in the relevant Workspace, select the tab of the Area you wish to delete.
2) Select Delete Area at the top right-hand side of the screen.
3) You will now be prompted to confirm deleting the Area. Select Yes. Please note that deleting an Area is irreversible.
| WC |
|
|
This section is only relevant to users assigned the role Workspace Coordinator. A Folder in Enquire represents a Project.
1) Log into your Enquire account and select the drop-down arrow next to Workspaces in the primary navigation menu. Select the Workspace you wish to enter from the drop-down menu.

2) Navigate to the relevant Area you wish to create a Folder in.
3) Select Add
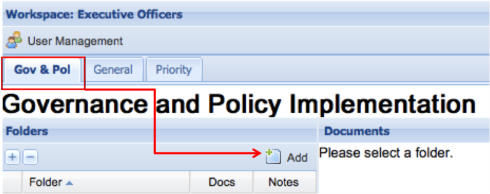
4) Enter in a Name for the Folder and then select Save. You have now created a folder.

Child folders may be created to further refine each aspect of you workspace. See below for instructions.
1) Select the drop-down arrow beside the Folder name to which the Child Folder will fall under and select Add Child Folder.
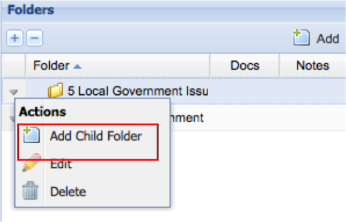
2) Enter in a name for the Child Folder and then select Save.
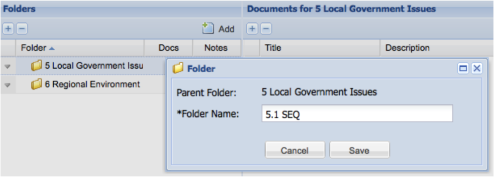
1) Navigate to the relevant Area within your Workspace where all Folders and Child Folders will be listed.
2) Select the drop-down arrow next to the Folder or Child Folder Name you wish to edit.
3) Select Edit. You will now be able to edit the Name of the Folder.
4) Select Save. Your changes will take place immediately.
1) Navigate to the relevant Area within your Workspace where all Folders and Child Folders will be listed.
2) Select the drop-down arrow next to the Folder or Child Folder Name you wish to remove and then select Delete
3) You will be prompted to confirm if you wish to delete. Select Yes. Please note that deleting a Folder and the contents in it is irreversible.
1) Log into your Enquire account and select the drop-down arrow next to Workspaces in the primary navigation menu and select the Workspace you wish to enter from the drop-down menu.

2) Select the Area from the tabulated bar across the top of the Workspace and then the relevant Folder/Child Folder from the Folders area on the left-hand side.
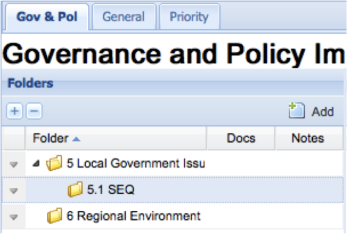
3) A Documents box will now appear to the right of the Folders section. Select Add located on the top right-hand side.
4) You will now be prompted to enter in the Document identifiers and information. Enter in the title, description and document type. The Document type can either be a URL or a file saved to your hard drive.
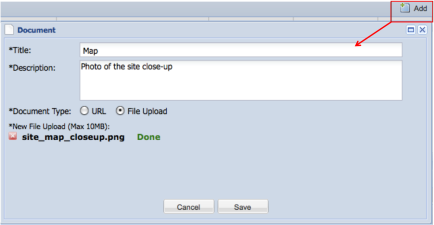
5) Select Save. You will now see your Document listed, as well as a User and Date/Time stamp and Version Number.
1) Select the drop-down arrow beside the relevant document and choose Update.
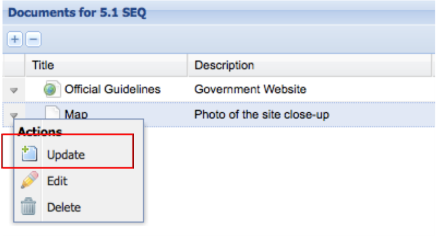
2) A pop-up window will now allow you to Update the file. Browse for the file saved to your hard drive and then select Upload.
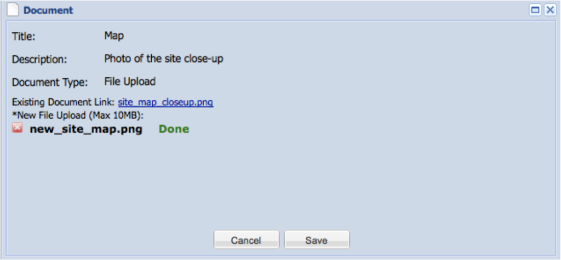
3) Pressing the arrow beside the original file will expand and show the new file you uploaded. Note the Version number is updated with the new document.

1) Navigate to the Document you wish to edit within the Workspace and select Edit from the drop-down menu beside it
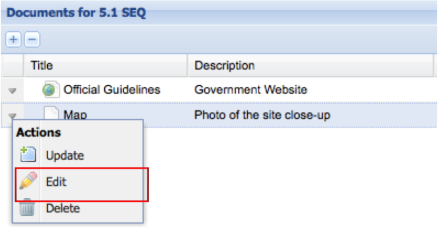
2) In the pop-up window that appears you will be able to make changes to the Document Title and Description only. Select Save.
1) Navigate to the Document you wish to remove within the Workspace and select Delete from the drop-down menu beside it 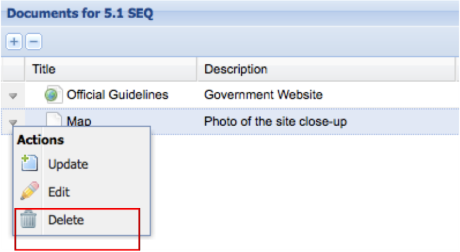
2) You will be prompted to confirm if you wish to delete. Select Yes. Please note that deleting a Document and the notes attached is irreversible.
1) Log into your Enquire account and select the drop-down arrow next to Workspaces in the primary navigation menu. Select the Workspace you wish to enter from the drop-down menu.

2) Select the relevant Folder/Child Folder from the Folders area on the left-hand side. The documents within this Folder will now display in the Documents area located on the right-hand side, and the Notes section will appear below this.
3) To add a note to the folder, select Add located in the top right-hand side of the Notes section.
4) A pop-up window will now allow you to enter in a Note, which will be viewable by all members of the Workspace. Select Save once you are happy with the Note.
5) Your Note will now be listed under the Folder.

1) Navigate to the relevant Document you wish to view within the containing Folder and click on its title to see the Notes for that Document listed.
2) Select the drop-down arrow next to the Note and then Reply

3) Enter in a reply to the Note and then select Save.
4) The reply will now be listed underneath the initial Note as a thread. You can edit/delete your addition to the thread via the drop-down area beside your Note contribution.

NB Only the author has access to edit their Note [with the exception of Coordinator].
1) Navigate to your created Note you’ve attached to a Document
2) Select the drop-down arrow beside the Note and then select Edit
3) In the pop-up window you will be able to make changes to the body of the text. Select Save when you are happy with the changes.
NB Only the author has access to delete their Note [with the exception of Coordinator]
1) Navigate to your created Note you’ve attached to a Document
2) Select the drop-down arrow beside the Note and then select Delete
3) You will now be advised to confirm deleting the Note and any threads attached to it. Select Yes. Once a Note has been deleted the changes are irreversible.