Interactive Menu: Click on any section of the contact card below to see information about that item. If you cannot see what you are looking for, try the content list below.
Within a CRM contact record, users will be able to manage various pieces of information about contacts such as parent and child relationships, contact lists, lot and plan information, change history and client engagement.
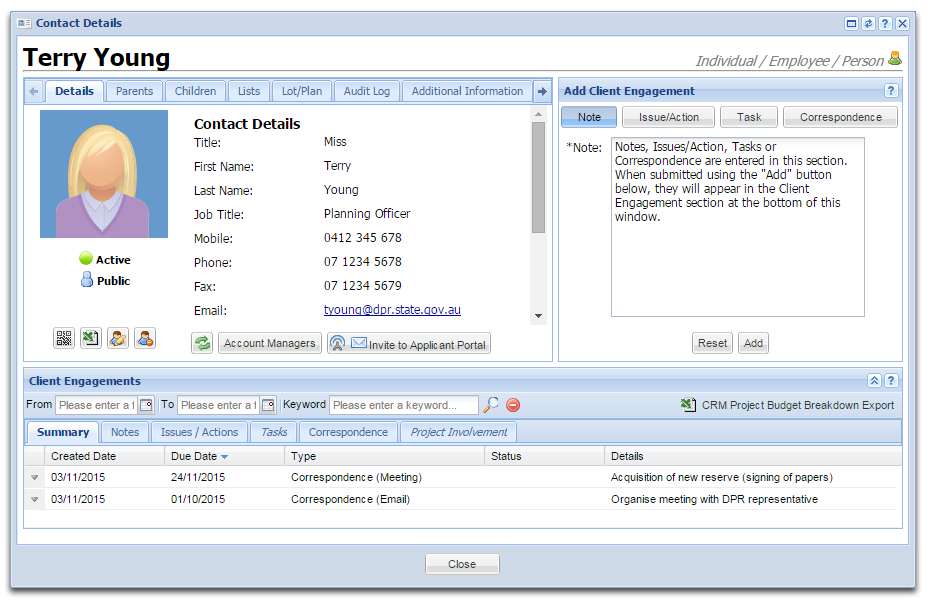
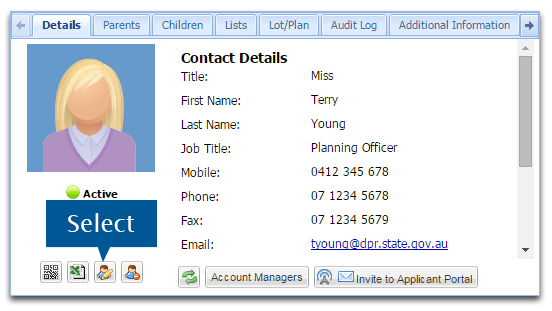
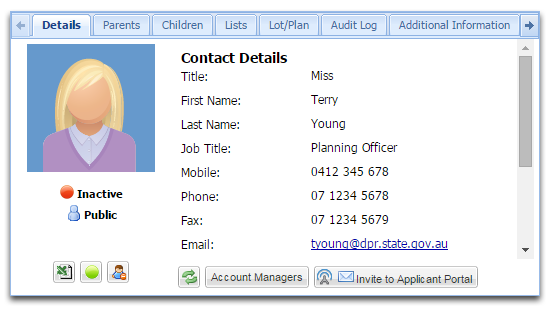
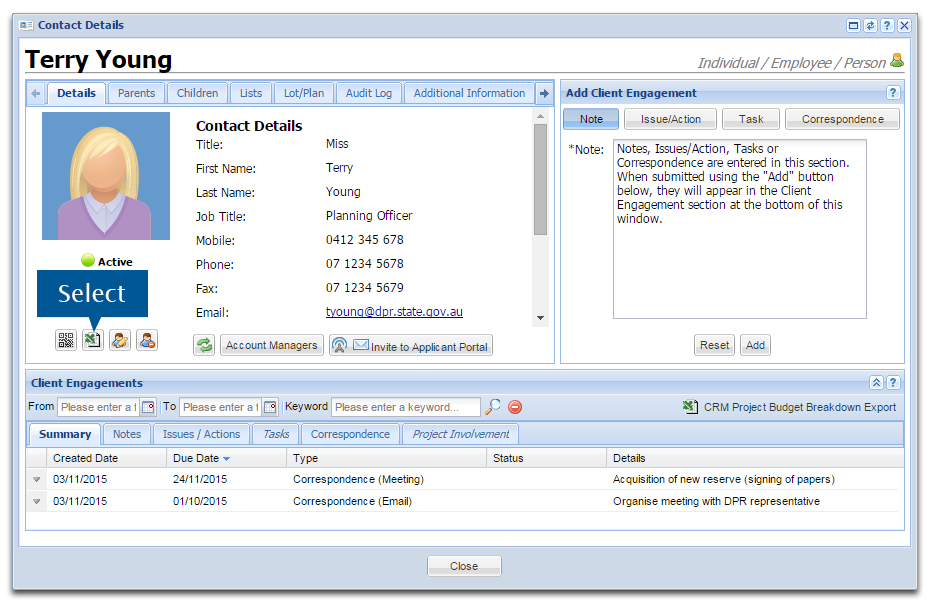
Below is an overview of the contact details card.
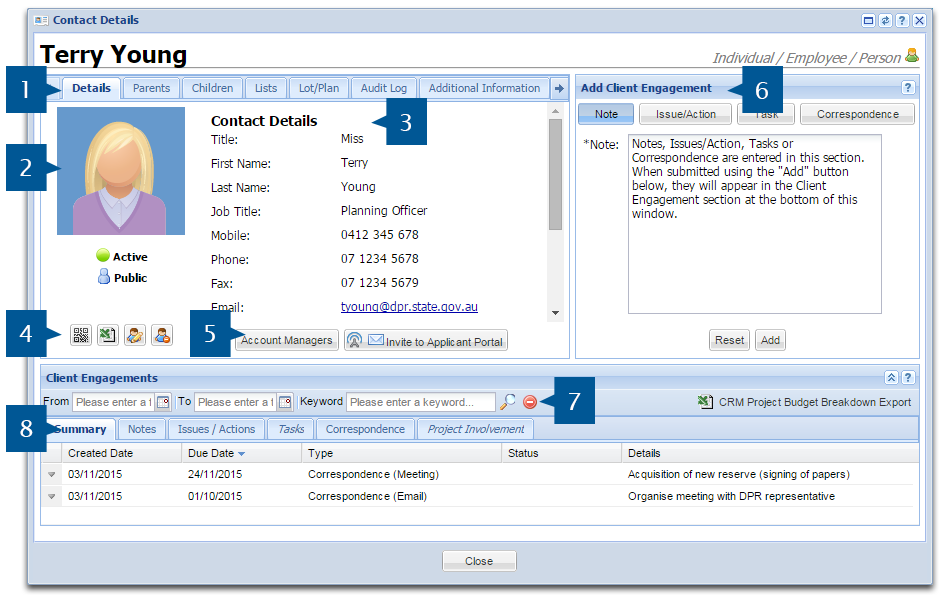
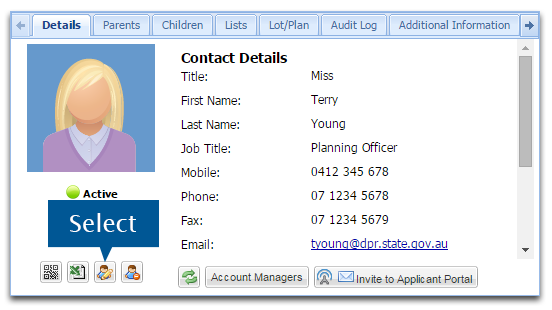
1. CRM Detail Tabs are used to access specific details about the contact and its relationships.
2. A Contact Image can be added to help with contact recognition.
3. Contact Details include basic information about this contact.
4. Scan, Export, Edit and Delete contact information.
5. Select Account Managers who will be responsible for maintaining this contact's information.
6. Add Client Engagement information such as tasks, actions and correspondence.
7. Search Client Engagement information for specific events, emails, notes or other project details.
8. Summary of contact engagement and project involvement.
Contact details also have hyperlinked information. Select an item to navigate to perform a function such as navigating to more information.
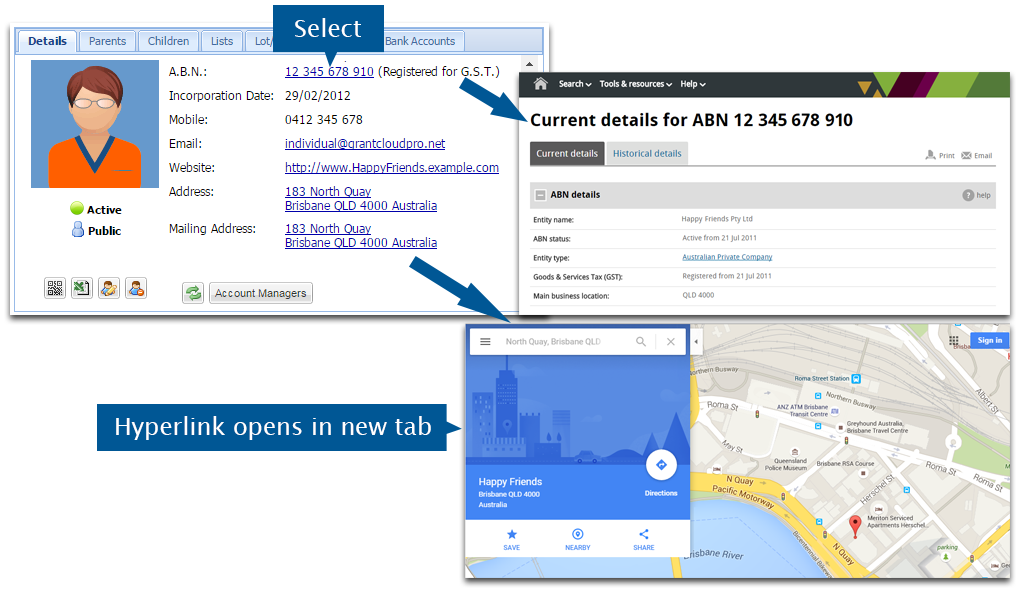
| Item | Function |
| ABN | Opens the ABR entry in a new tab or window |
| Website | Opens the contact's wesbite in a new tab or window |
| Users your email client to send an email to the contact's address | |
| Address | Opens up the location in Google Maps in a new tab or window |
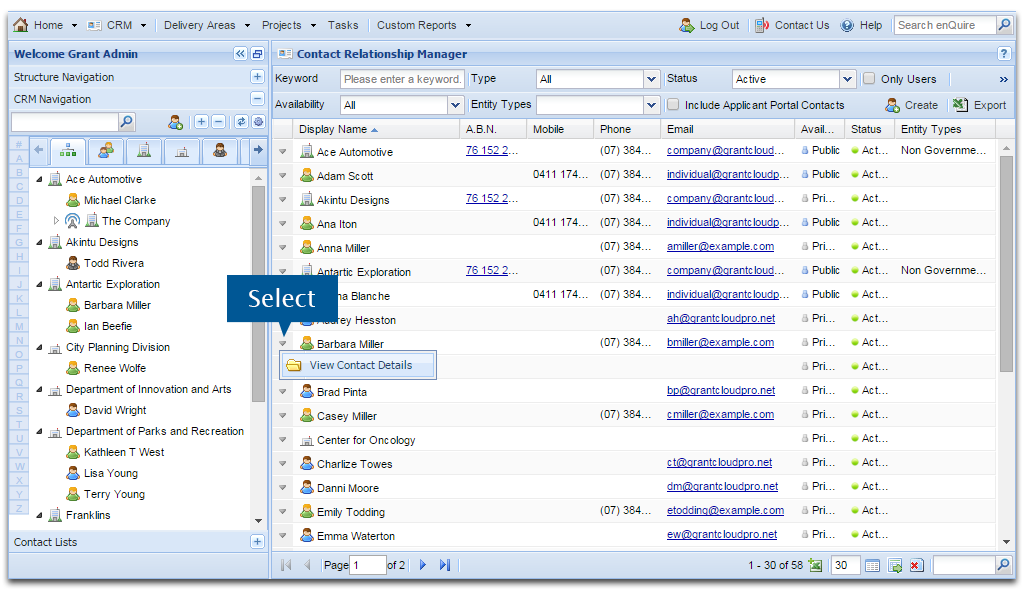
There are various ways to access contact details:
1. Double click on the contact name in either the CRM window or left hand CRM Navigation panel to open the contact details.

2. Right click on a contact in the CRM or left hand CRM Navigation to open the menu and select View Contact Details or Open Item.
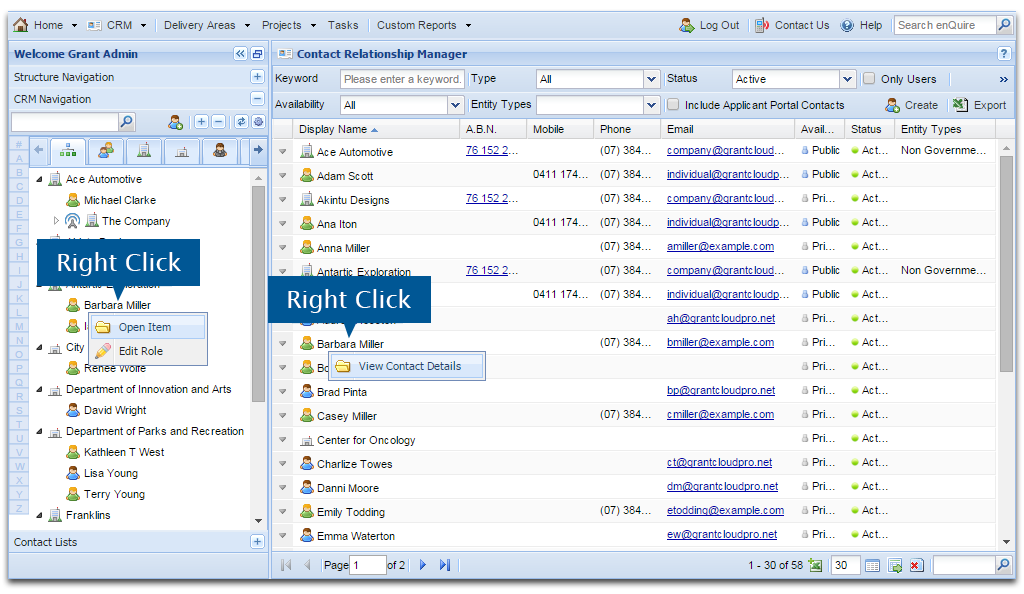
3. Select the down arrow next to the contact in the main panel CRM (List View only) and select View Contact Details from the menu.
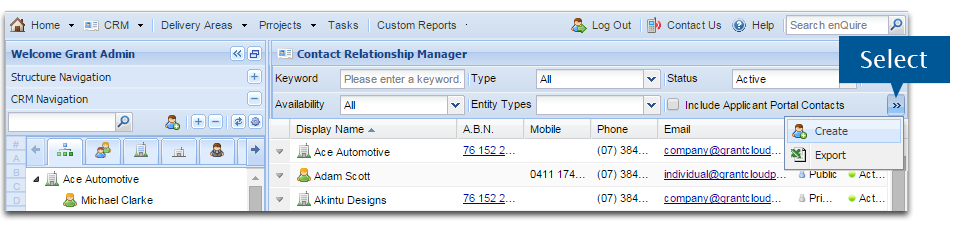
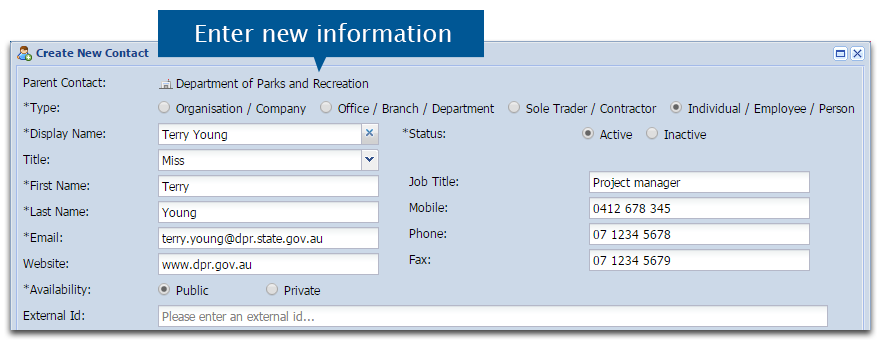
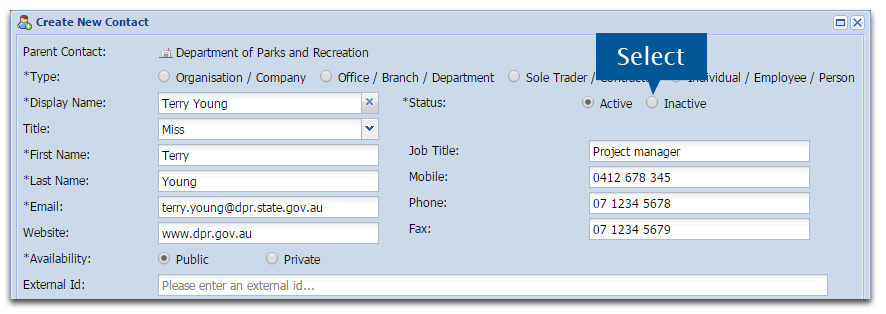
1. In the CRM window or left hand CRM Navigation panel, select Create.
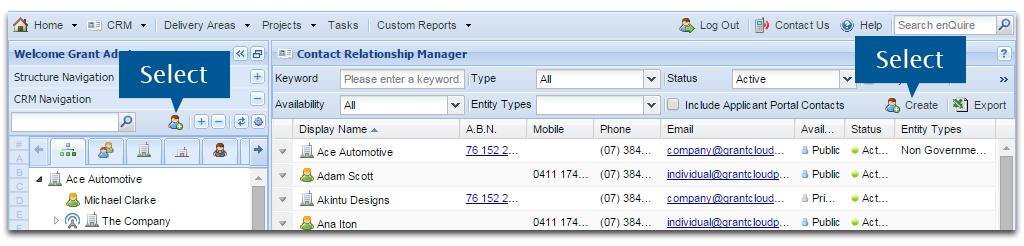
If you are working on a small screen, you may need to open a menu to select Create.
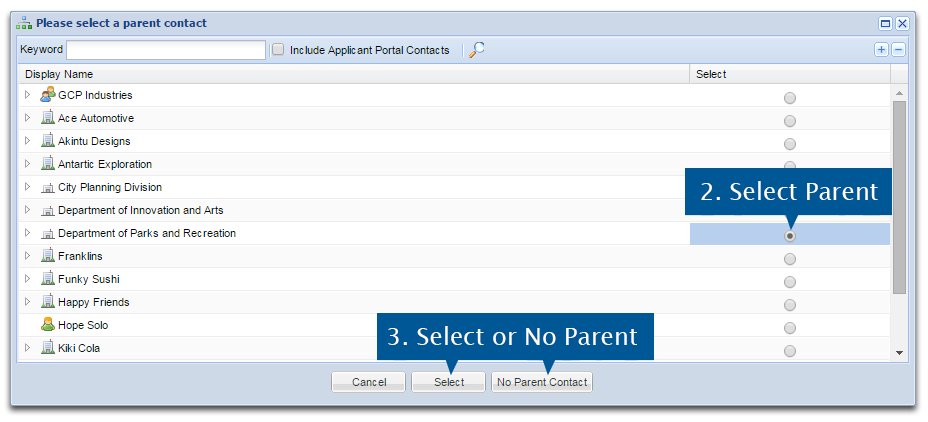
2. Select the Parent Contactfor the new contact from the list.If you are creating a contact that doesn't require a parent (such as an organisation or sole trader), go to step 3.
3. If you chose a parent contact, press Select. If your contact does not require a parent contact, select No Parent Contact .
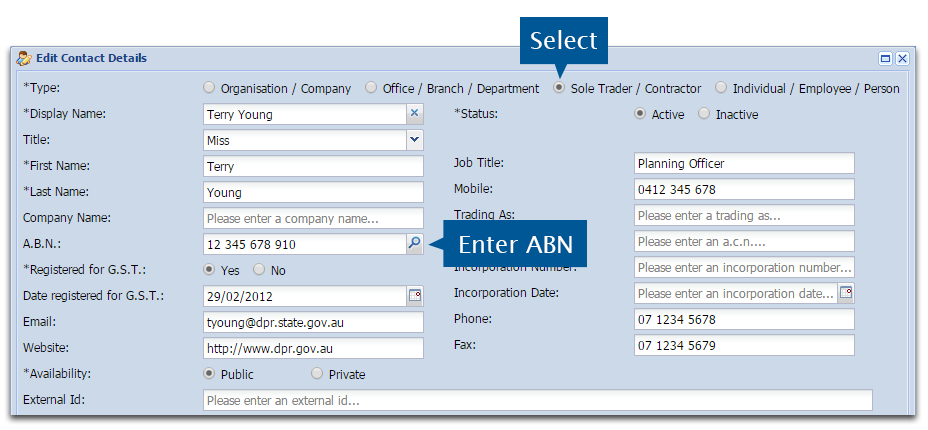
3. Enter the mandatory details of your contact.
The Availability of members can be assigned as Public (internal and external) or Private (internal only).

A variety of contact types can be created, including Organisation/Company, Office/Branch/Department, Sole Trader/Contractor, and Individual/Employee/Person.
When you enter the details of an organisation, office or sole trader, you can use the magnifying glass next to the ABN field to bring up details about the company using the Australian Business Registry. The search will use the following details from the CRM:
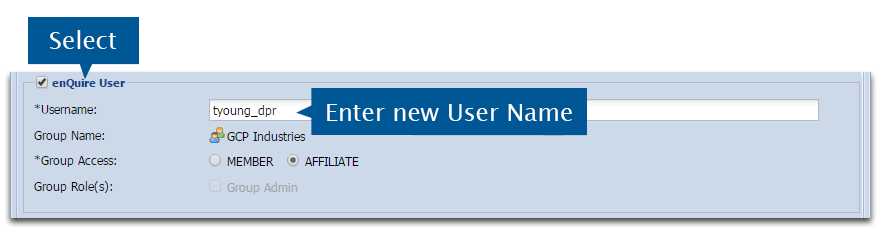
Group Administrators have the ability to make a contact an Enquire user. See the Manage Users page for more information.
An Entity Type can also be added. This allows you to complete searches based on the type of contact.
Select Save when you are done.

Open the relevant contact record.
1. Select the Edit icon located underneath the contact's avatar.
2. Edit the contact details as required.
3. Select Save when you are done.

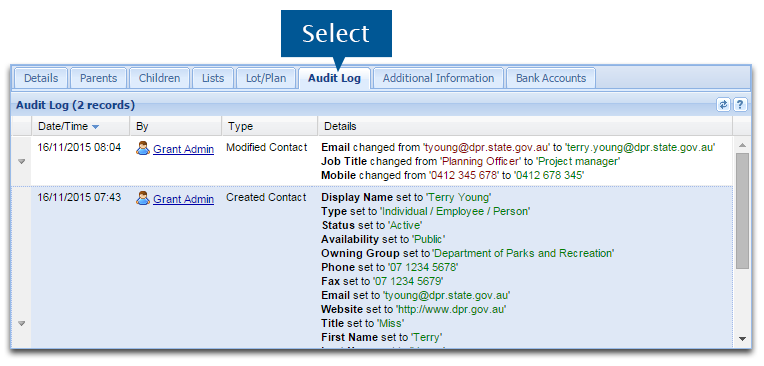
The Audit Log tab tracks any changes made to any contact's Details tab.
| GAD |
|
|
This is a permanent action. Deleted contacts cannot be recovered.
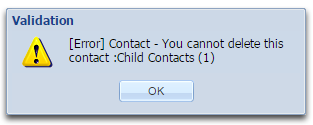
You will not be able to delete a contact if:
All links will need to be removed before a contact can be deleted.
If you have multiple contacts with the same display name, consider merging them rather than deleting them. If you wish to retain references to this contact, consider deactivating the contact rather than deleting them.
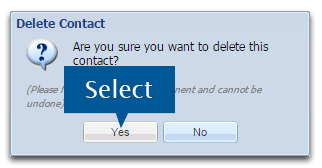
Open the contact that you no longer need.
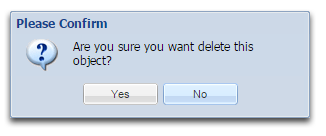
1. Select the Delete Contact icon under the contact's avatar.

2. Select Yes to confirm the deletion.
Validation Error: Child Contacts
If your contact has any child contacts, you will receive an error message. See the Children Tab on the contact page to identify any child contacts. Delete any child contact links. Navigate back to the contact in the CRM to complete the deletion.
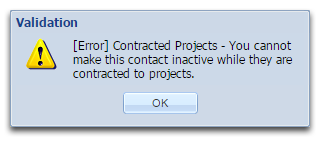
Validation Error: Contracted Projects
If your contact is linked to an active project, you will receive an error message. See the Project Involvement Tab on the contact page to identify the project/s the contact is linked to. If the Finish Date is in the future, the contact is linked to that project.
If you still wish to delete the contact, navigate to the project they are involved in by double clicking on the project in the contact's Project Involvement Tab or searching for the project. Remove the contact from the project or select an alternate contact to replace them. Navigate back to the contact in the CRM to complete the deletion.

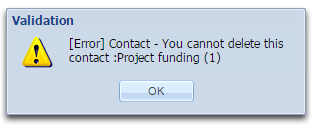
Validation Error: Project Funding Partner
If your contact has contributed funding to an active project, you will receive an error message. See the Project Involvement Tab on the contact page to identify the project/s the contact is linked to. If the Finish Date is in the future, the contact is linked to that project.
If you still wish to delete the contact, navigate to the project they are funding by double clicking on the project in the contact's Project Involvement Tab or searching for the project. Remove the contact from the project. Navigate back to the contact in the CRM to complete the deletion.
Validation Error: Contact (part of a Contact List)
If your contact is part of a Contact List, you will receive an error message. the message will identify how many contact lists the contact is linked to. Go to the Contact List Navigation panel and identify the lists the contact is linked to. Remove the contact from all lists. Navigate back to the contact in the CRM to complete the deletion.

| GAD |
|
|
You can deactivate a contact if they are no longer working with your organisation but you wish to retain references to them within Enquire. An inactive contact cannot be selected as a participant or delivery agent in areas such as Projects and Delivery Areas. To deactivate a contact:
Open the relevant CRM contact record.
1. Select the Edit icon under the contact's avatar.
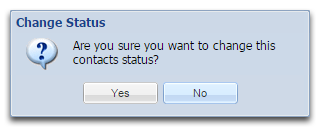
2. In the Status section, select Inactive.
3. Select Yes when prompted.
|
If your contact is linked to an active project, you will receive an error message. See the Project Involvement Tab on the contact page to identify the project/s the contact is linked to. If the Finish Date is in the future, the contact is linked to that project. If you still wish to deactivate the contact, navigate to the project they are involved in by double clicking on the project or searching for the project. Remove the contact from the project or select an alternate contact to replace them. Navigate back to the contact in the CRM to complete the inactivation.
|
4. Select Save to confirm the inactivation.
The contact is now inactive. Their contact details cannot be edited but other tab details and client engagement records can still be updated.
| GAD |
|
|
Inactive contacts can be reactivated if required.
Open the relevant inactive contact's CRM record.
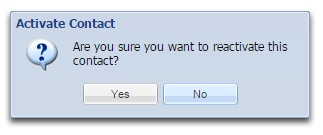
1. Select the Reactivate button under the contact's avatar.
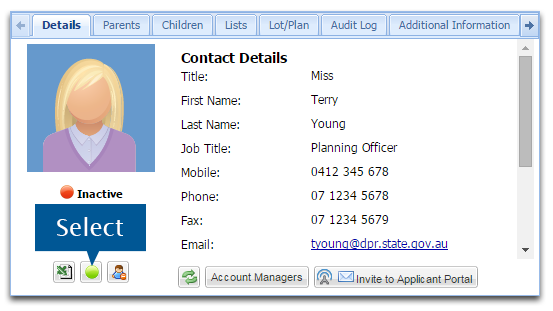
2. Select Yes when prompted. The user will now be reactivated.
Open the relevant contact.
1. Select the contact's avatar to add or update a contact's photo.
![]()
2. A contact's avatar can be updated via:
a) Selecting one of the default avatars.
![]()
b) Entering a URL for an online image file.
![]()
c) Uploading a photo from your computer.
![]()
3. Select Save to confirm the update to the contact's avatar.
Entity Types are groups of CRM contacts that simplifies organising and search the CRM for particular contacts. An Entity Type must be added to a CRM contact for it to be visible in an Entity Type search. For more information on setting up Entity Types, see our page on Managing CRM or contact the Enquire Help Desk on +61 7 3911 1245 or support@enquire.net.au.
After setting up the Entity Types, you can assign a CRM contact record an Entity Type that has been setup and is relevant to your organisation. This could be categories like supplier, investor or school.
1. Select the Edit button.
2. Select the Entity Types checkbox. This will bring up a list of Entity Types for you to select from.
3. Select the Entity Types that the contact falls under. Select Save to confirm your choice.
The new CRM contact entity type feature allows you to easily organise your CRM records in a standardised manner against groupings that makes sense for your organisation.
The address validation service is only available if you have requested it as part of your Enquire implementation. If you would like this to be activated or require more information, please contact the Enquire Help Desk on +61 7 3911 1245 or support@enquire.net.au.This service can only validate addresses in Queensland, Australia using the following fields:
State, postcode and country details will automatically be entered by the validation service if your address matches its database.
When an address is validated, additional address details will be added to the contact record. These are:
Errors may occur with the validation of your address because:
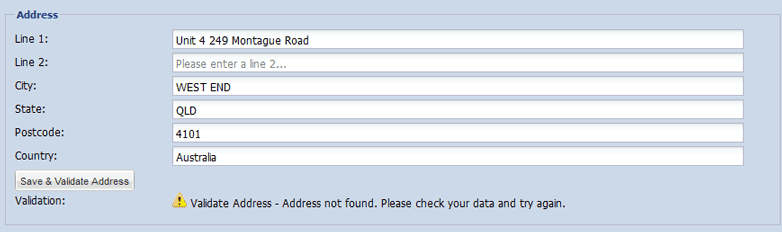

Open the relevant CRM contact.
1. Select the Edit icon to open up the Edit Contact window.
2. Scroll down to the address section.
3. Enter the street address into the Line 1 field.

4. Select the Save and Validate button.
If the address matches the validation service's database, the address will be validated and additional information will be added to the contact record.
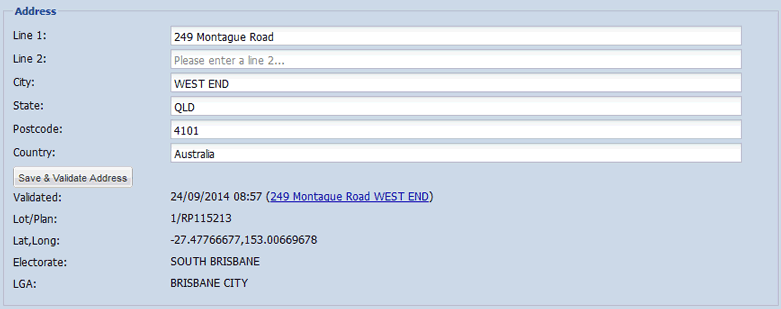
If your address doesn't match the validation service's database, the address will not be validated and an error message will appear. The address section can still be used as per normal and the invalidated address will be saved to the contact record.
5. Select Save to retain the validated address and additional details.
Information about the address will also be saved to the Lot/Plan tab for contact location management.

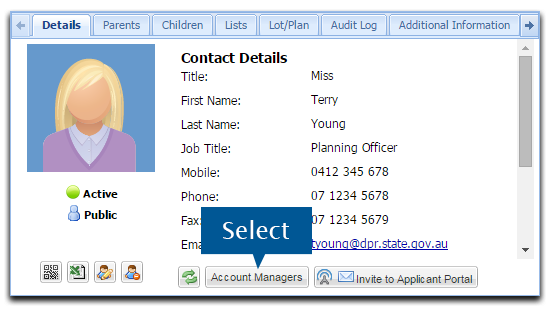
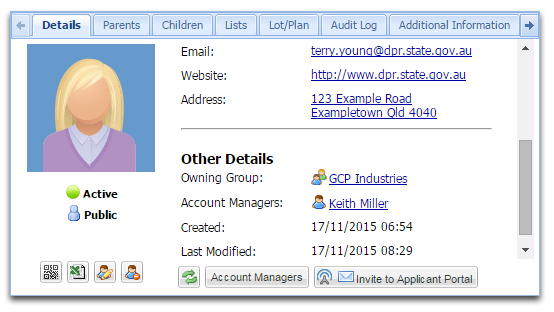
Contacts and users can be identified as Account Managers who liaise and manage clients and their account for your organisation. Clients and contacts can have multiple Account Managers as this position may be shared within your organisation.
Open the relevant CRM contact record.
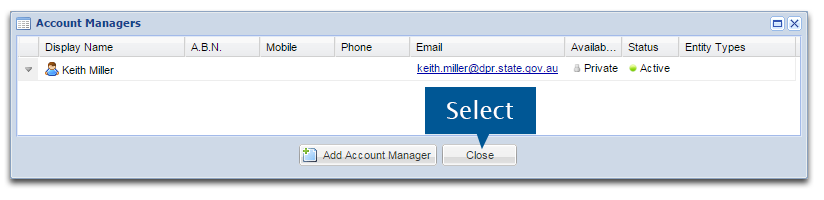
1. Select the Account Managers button on the Details tab.
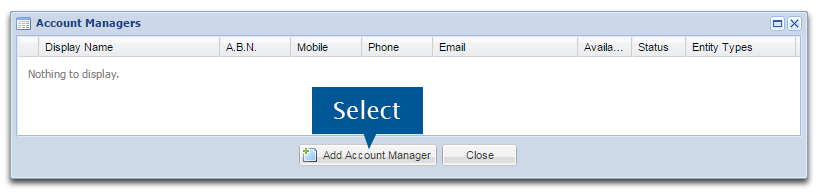
The Account Managers window will open. If Account Managers have already been assigned, these will be displayed here.
2. Select the Add Account Manager button.
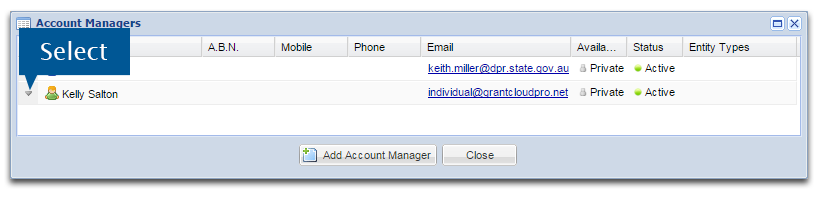
3. Locate the contact that will be the Account Manager. Select the checkbox beside their name.
4. Confirm your choice with the Select button. You can select multiple contacts if you wish to assign more than one Account Manager.
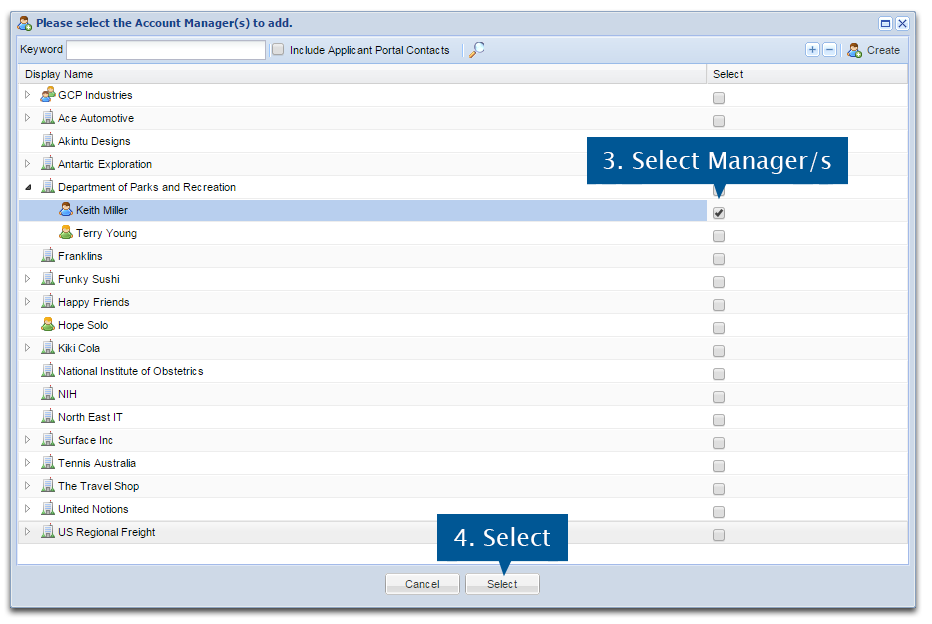
You can also search for an account manager using a keyword such as the name of a person or organisation.

5. The Account Manager has now been assigned. Select Close to return to the CRM contact record.
The Account Managers will be displayed on the Details tab of the CRM contact.
Open the relevant CRM contact record.
1. Select the Account Managers button on the Details tab.
2. Select the down arrow next to the Account Manager you wish to remove.
3. Select Delete from the menu.
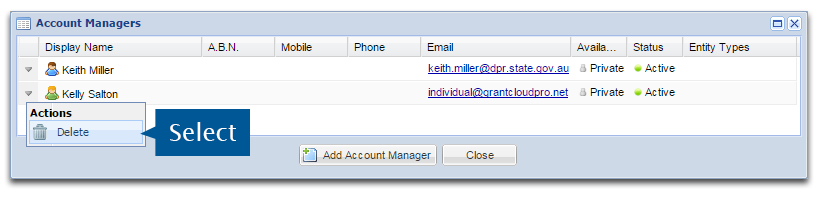
4. Select Yes to confirm the deletion.
5. The Account Manager has now been deleted. Select Close to return to the CRM contact record.
The CRM allows you to view changes that have been made to a contact's record through the Audit Log tab. Historical change details include the date and time of the change, who made the change, the type of change and the details of the change. These details are display chronologically.
Open the relevant CRM Contact.
1. Select the Audit Log tab.
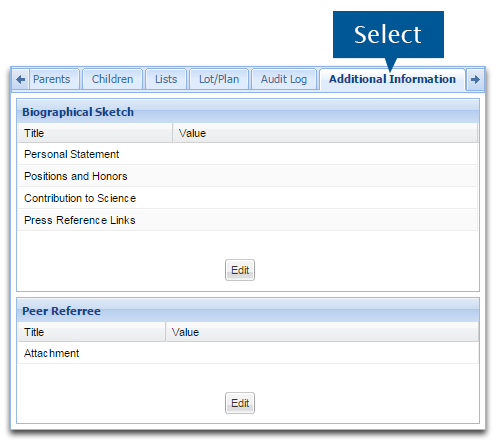
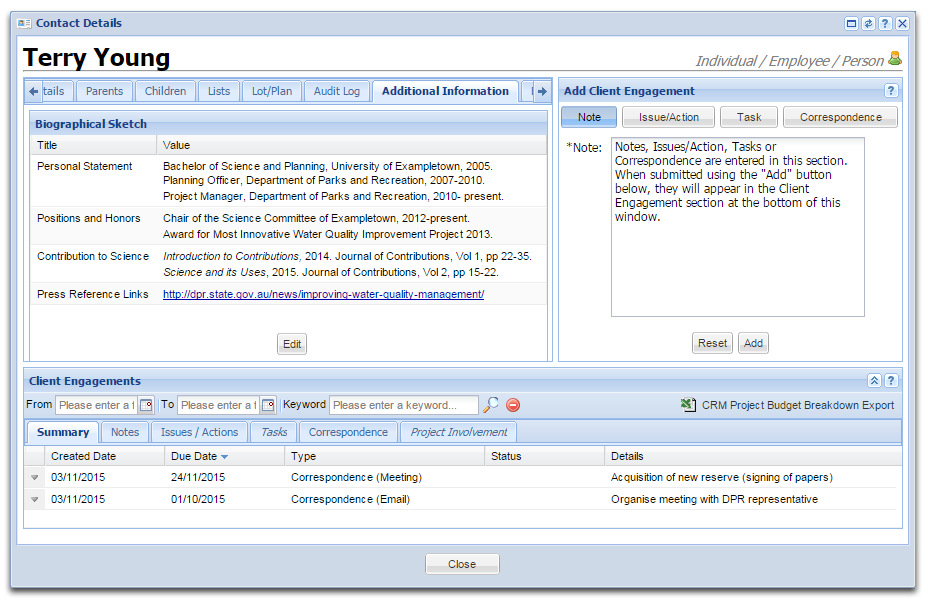
User Defined Components (UDCS) can be used to capture additional information about contacts through the Additional Information tab. Please see our page on User Defined Components for in-depth information on this topic.
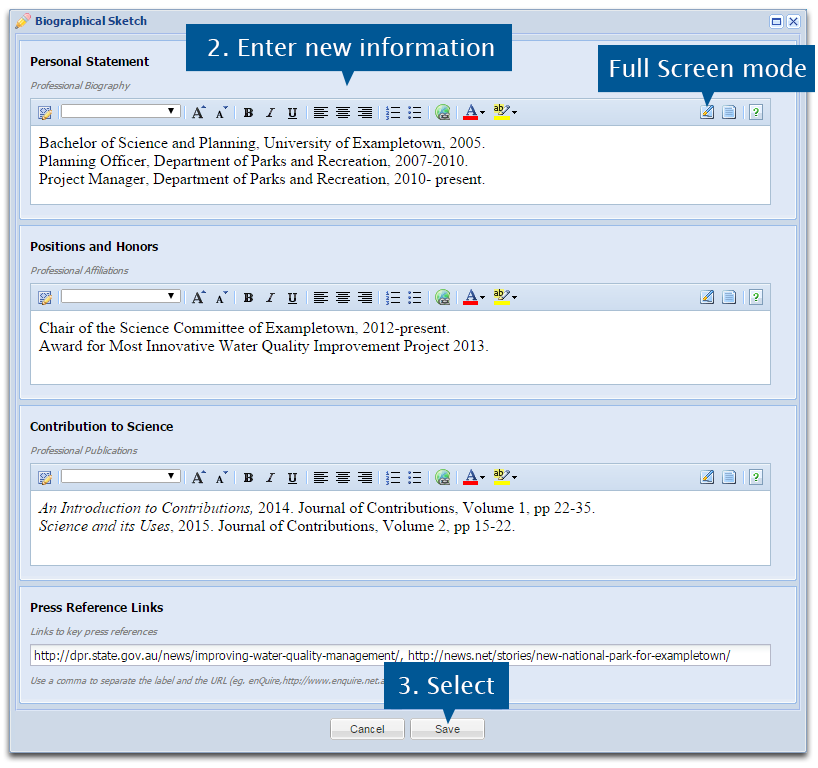
In this example, the UDC is used to collect information about a contact's qualifications and professional achievements.
Open the relevant CRM contact card.
1. Select the Additional Information tab.
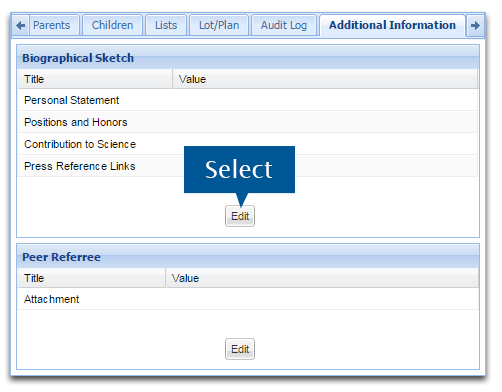
2. Select Edit to add information to the UDC.
3. Enter information into the relevant fields. The pen and paper icon opens a new window if you have a large amount of information to add.
4. Select Save when you are done.
The new details have been added to the contact card.
CRM contacts can now be scanned and saved straight into your smartphone via a Quick Response (QR) Code .
Note: Before you can scan a contact from CRM into your smartphone, you will need to install a QR scanning app. For Android, we recommend the Barcode Scanner app and for the iPhone we recommend QR Reader for iPhone. Both are free apps available from your relative app stores.
When scanning a QR code, the following information will be generated:
Open the relevant CRM contact record.
1. Select the QR Code icon located under the contact's avatar. A large QR code will be displayed on screen.

2. Open your selected scanning app on your phone and scan the QR Code.
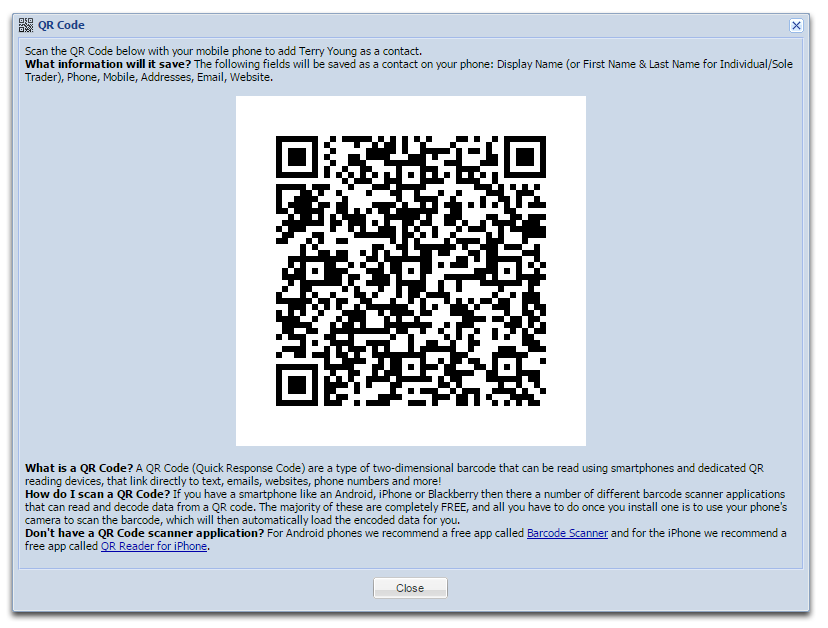
3. The contact will appear on your mobile device ready to be saved to your address book. Save the CRM contact to your mobile device as you would a new contact.

Open the relevant CRM contact record.
1. Select the Excel icon located underneath the contact's avatar.
2. Enquire will export the contact's CRM record and generate a spreadsheet. Choose a destination and select Save if required. For additional information on downloading files, see Why can't I download files from Enquire?

3. Open the file to view contact details. Additional information such as engagement history, parent/child contacts and work history are available as tabs on the spreadsheet.